Better photographing your maps
 In short :
We need images at a minimum of 2,500
pixels wide and extension in jpg
- Shoot your images in the highest camera resolution sensitivity (down to ISO 100)
- place your camera on a tripod and use the shutter timer to eliminate excess motion.
- Save your image in jpg format and WITHOUT compression.
- Make a picture of the item, including the full margins.
- If the item has interesting text, also make an image of the verso.
When selling an atlas or book, we recommend adding images of the binding, title page, and some illustrations.
A sample image is to the right!
Camera
We can not emphasize the importance of good images enough! Better images do result in higher bids. An investment in a good High-Resolution camera is paid back quickly.
We recommend the Samsung NX 300, one of the best cameras available and undoubtedly less expensive than the Hasselblad we use!
Lighting
The most basic promise of getting a good photo is to light your map or print with as even of a light as possible.
Do not make your image next to a window. Try shooting with your flash on if you do not have enough light. Making pictures in a room with TL lighting works best.
If you want to make good images, read the following:
The best way to do this is with strobes and bounce umbrellas. Bounce umbrellas not only reflect the light backward, but they soften and spread it in the process. Soft light is essential.
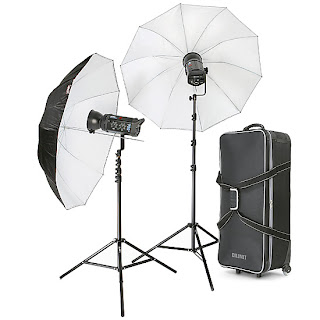
You can use a monolight kit, consisting of 2 x 750-watt/second strobes (1,500 total), complete with umbrellas and stands. A set costs about $1,000.
I recommend a 'continuous light' kit if you want something less expensive. Something like THIS. A setup like this will cost about $400
The advantage of the strobes is a much brighter and much whiter light. Having a lot of light is crucial if you want a lot of detail, and the whiter light makes color-balancing your image much easier. The strobes also have an adjustable intensity, which the continuous light does not. Lastly, strobes do not put out as much heat as continuous lights. Continuous lights are commonly called 'hot lights'......for a very good reason.
It may not seem like a big deal, but trust me, and you will sweat after 40 minutes under a 650-watt bulb.
We use Profoto BIX studio Flash lighting.
So what if you can't afford either set-up?
You can achieve similar, albeit diminished, results with common lighting tools found at a Walmart or Home Depot.
I would recommend:
4 x clamp lights, like THESE
4 x 120W compact fluorescent bulbs, in the 5000K range, like THESE
2 large sheets of white foam core.
Total cost: $50
White Balance:
White balance is imperative! Look at your lightbulbs and find out the exact color rating. The closer to 5000K (or above), the better.
If it is anything less than 4000K, your image will be too yellow. Halogen lamps and TL lights are not suitable as they produce 2900K so, in addition, you have to use your camera Flash.
Once you know the temperature rating of your bulbs, set your camera to that exact white balance.
Your camera may only have a 'custom' option. In this case, you must photograph a 'grey card', to accurately calibrate your camera.
Positioning of your lamps
Once you have the necessary lights, the next step is positioning.
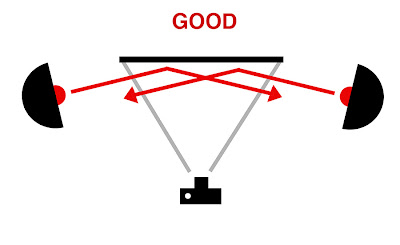
I photograph my maps at a 90º angle. To either side of my map, is one of my strobes. I aim the strobes AWAY from the map and let the umbrellas bounce the light BACK toward the painting at roughly a 160º angle. This is called a 'raking' light.
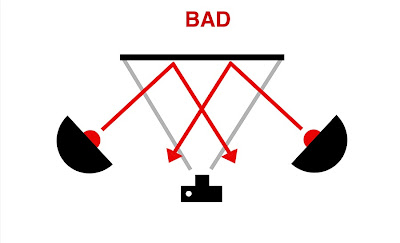
This angle is critical! If you place your lights so that the light strikes the object at an acute angle (less than 90º), the light will bounce off the painting and back into the camera lens... causing glare. Glare is a reflection of the light source on your painting's surface. The more acute this angle is, the worse the glare will be. An on-camera flash would result in the worst glare possible since it strikes the surface at an angle of 0º degrees.
Once the lights are in position, I set up my camera and tripod. Now, cameras and lenses are a big can of worms that I will not open here. We could talk about that for days! It is sufficient to say; the better camera you have, and the better lens you have, the better your image will be.
Lenses:
I shoot with a 50-100mm zoom lens. A zoom lens is efficient so you do not have to move the camera forward and backward.
Aperture:
Many assume that narrowing your aperture to F/22 will always give you the crispest shot. This is not true. Any adjustable zoom lens has a 'sweet spot', a perfect combination of aperture and zoom where the light is most focused. (Think of it as the sun through a magnifying glass). This sweet spot is usually in the middle of a lens's zoom/aperture range. To find it, you need to experiment.
File Format:
Check your camera's settings and find the highest quality/compression possible. Many high-end cameras offer a RAW format option.
JPG is short for Joint Photographic Experts Group, and is the most popular image format used on the web.
JPG image is not as sharp as the original image. The colors are paler, the lines are less defined, and the picture is noisier.
Always save your items WITHOUT compression or 80% compression at the max.
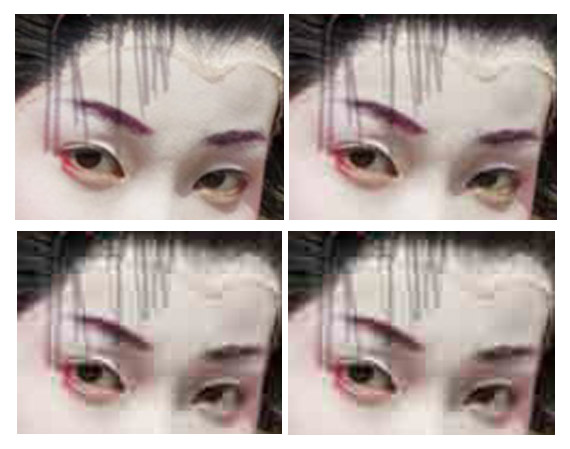
Below is a sample of JPG compression levels varying from highest to lowest. Almost every digital camera can shoot and save in JPG format. Remember to save or convert images WITHOUT compression or 80% at the max.
If possible, shoot in RAW format, as it does very little compressing and allows you to alter your exposure/color settings after you shoot the image.
Afterward, you can convert to JPG.
ISO:
Always shoot at the lowest ISO possible (Sometimes called ASA). I typically shoot at 50 or 100 ISO. If you go above 400, you will likely get a lot of noise in the dark areas. It's better to have a really slow shutter speed than to try to bump up the ISO.
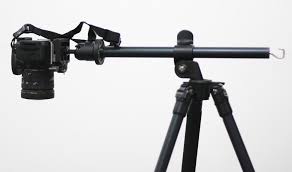 Do not attempt to handhold a camera when reproducing your work. Even the subtlest of vibrations will ruin the detail. In fact, I use a sturdy tripod and usually set my camera on a delayed timer because the simple act of even pressing the shutter button by hand is often enough to shake the camera. Likewise, if your camera lens has a Vibration Reduction feature, turn it off. Without vibration, that feature actually does more bad than good.
High pixel-count cameras like the Nikon D800 and Nikon D800E, for example, need to be stock-still and used in mirror lock-up or exposure delay mode to get the benefit of their resolving power if the shutter speed is below around 1/125th second.
Photo Editing
If you are looking for a good and free photo-editing program, we would suggest GIMP or the commercial software Photoshop by Adobe.
If cropping your photos, please show at least 1cm of a margin, or even better - full margins.
Tethered shooting is a technique many professional photographers have practiced for years. In short, tethering allows you to connect your camera to a computer or tablet and almost instantly view your digital images on the device within seconds after they are captured.
GENERAL
We need images at a minimum of 2,500 pixels wide. Shoot your images in the highest camera resolution sensitivity (down to ISO 100), place your camera on a tripod, and use the shutter timer to eliminate excess motion. Save your jpg-image WITHOUT compression. We can not emphasize the importance of good images enough! Better images do result in higher bids. An investment in a good High-Resolution camera pays you back quickly.
There are several good cameras on the market for 500 - 750 US$.
Cropping images.
If cropping your photos, please show at least 1cm of a margin or, even better full margins. Generally, we crop outside a Medieval manuscript page leaf and show both sides!
If you are looking for a good and free photo-editing program; we would suggest GIMP or the commercial software Photoshop by Adobe.
Additional images.
When your item has text on the verso, or repairs we recommend adding an additional image. When you are selling an atlas or book we recommend adding images of the binding, title page, and some illustrations. You can upload up to 20 images.
Please upload one HR image including the margins of the item.
We do not add images of multiple parts of the main image.
Consignor center
In the consignor center, you can follow your items' buying and bidding process.